I’ve collected over 40,000+ emails through Aweber. Before you can reach that point, you need instructions on how to set on up. This article will provide that info.
Let me just side track just a tad into email marketing in general:
Every article I have written about email marketing has been about things to avoid because I have made made mistakes and many of the once thriving lists I had ended up dying out. But I know exactly what you need to do in order to have an email list of subscribers that love you and crave your newsletters.
The 3 things required to having a successful and thriving email list:
1) A niche site that has daily traffic. Never try to build an email list when your website has no visitors. Wait until it grows to a point where you get about 20 or more a day. Then it pays to have one.
People waste money on autoresponders all the time because they make fresh sites without knowing about this and what it takes to get traffic!
2) An actual sign up form that gets many conversions. Your website has to have easy access for any visitor to see a sign up form. You must also make that form appealing so that the visitor wants to sign up.
3) You must be very active with your subscribers. This means sending messages and being very responsive to any questions they send you! One of my biggest lists was completely destroyed because I didn’t do this. This was one my biggest failures and I learned how not to run an email marketing campaign.
Since I’ve written a ton about the first topic and provided a resource above to help you get traffic, I want to cover the second and third ones specifically for this post:
2) The sign up form:
You absolutely need to have an autoresponder in order to put a sign up form on your site. I have only used one: Aweber and it’s fine for me.
I don’t ever recommend free ones because they are generally tacky in quality. Other paid ones I’ve never used so I will only provide a tutorial on Aweber.
Once you get an autoresponder (let’s say you got Aweber), your job is to create a list BEFORE you create the sign up form and there are a lot of steps. The following are screenshots taken out of Aweber that will also help you.
Here are the 7 steps to create your first email list with Aweber:
Step 1:
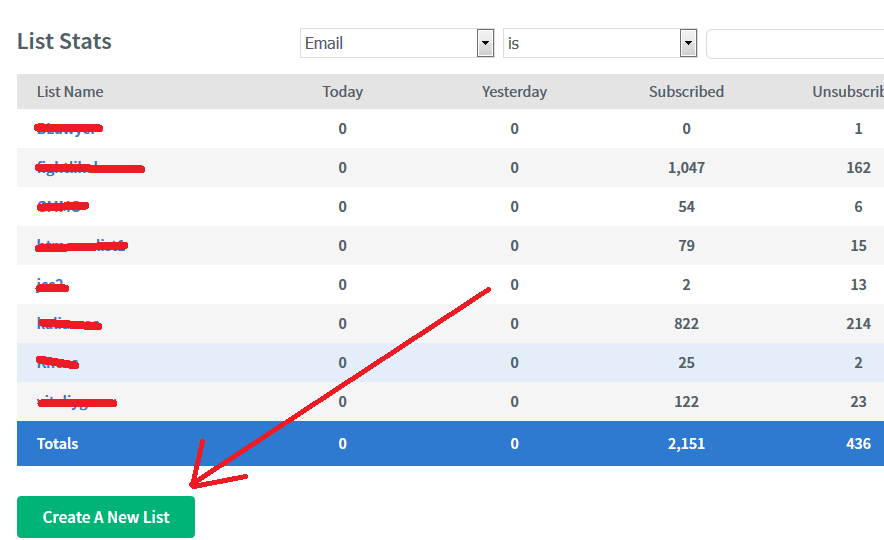
When you first get it, in order to create the sign up form, you first need to create a list and name it. To do that, in the main menu of Aweber, click “Create a New List”:
Step 2:
On the next page, you will have a series of credentials to enter, including the website you want this list to be associated with, a message that will be connected to it AND your address.
Now the part about the address may freak you out because YES, your subscribers WILL see it and by law, you have to disclose it. There are I believe options where you can use a P.O. Box instead, but honestly, I have never heard of any issues where email subscribers have threatened or done anything with that information.
Plus the address is way below any messages you send so most people don’t even see or get to it.
Step 3:
The next page after you enter that information asks to disclose what your list name will be and a short description of it. I think you can fill this in.
If my list is about weight loss, I can write “weight loss” or something that I know and in the description state I will help people with diet tips or something about health.
Step 4:
Now comes the part where you have an approved message set up. This is a message subscribers get when they sign up that asks them to confirm and basically consent to getting messages.
It is a filter that Aweber has made to help avoid spam and get more trust, BUT once you set up your email list, you can actually go back to the settings and turn this off.
In other words, by default, they will get the confirmation message BEFORE they get your first email and you can turn that off so they right away get your first message. I usually do that.
After you finish up with this step, your new list will be set up, but you still need to do a few more things before you make your web form…
Step 5:
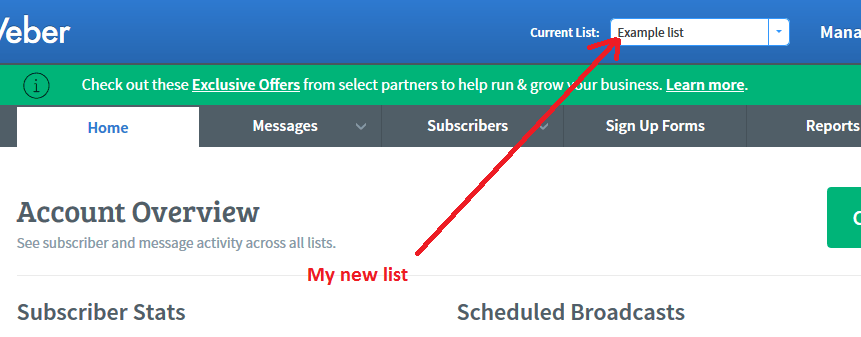
Find your newly created list in the menu in Aweber. I named my list “Example List”. Once I made it, it showed up, so I selected it:
Step 6:
Once I selected it, I then need to go to the menu where it says “List Options”, then “List settings”. Once I land on that page, I click on “confirmed opt-in”.
On this page is where I can do 2 things:
I can remove that option for a confirmed opt-in to appear. Since I usually do that, I just select it to be OFF.
Under that, there is “Success Page” option. This is the page where your subscribers are going to go when they sign up. You can leave that blank in which case when people sign up, they’ll just return back to the original page they were on before they signed up, but I personally like to create what is known as a “Thank you page” where I simply tell people that I am grateful they signed up and give them instructions such as telling them to check their inbox.
These instructions usually increase retention’s because many people don’t know what happens when they sign up or how soon they’ll get a message. Having a thank you page with instructions to explain this saves questions and helps push people to your email newsletter, rather than your site and in the long run.
Step 7:
OK, now it’s time to FINALLY set up the web form! Click on “Sign up forms”:
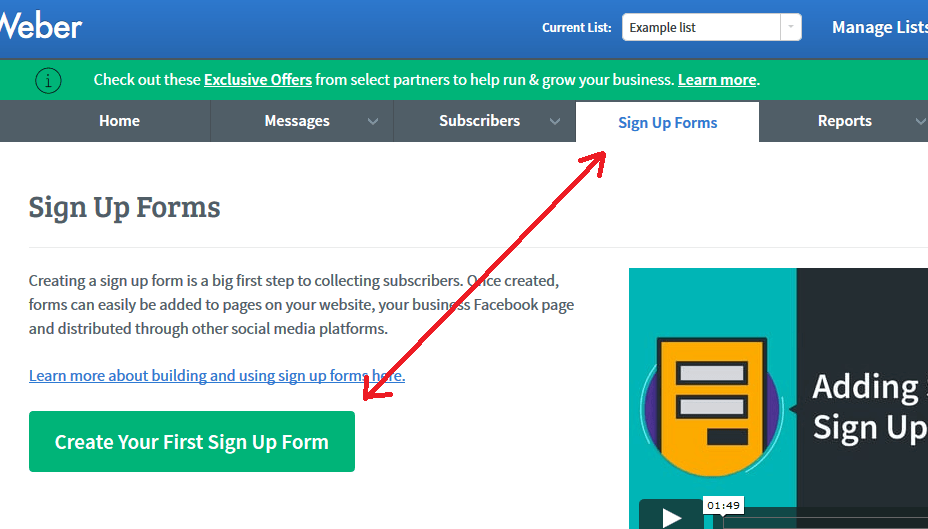
After that you will get a number of options to create your form and I recommend you watch a video I made showing this. I always go for something plain but there are templates which suite different niche topics. For example:
- Something pertaining to making money has $100 bill templates.
- Something relating to Christmas has template with gift pictures.
- Ect…
You can choose one of those or create your own where you can edit the colors, ect… I always like to keep my web form messages very short, but give enough incentive.
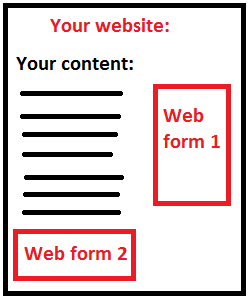
Do note that you can make several web forms and put them on your website. I usually make 2 of them.
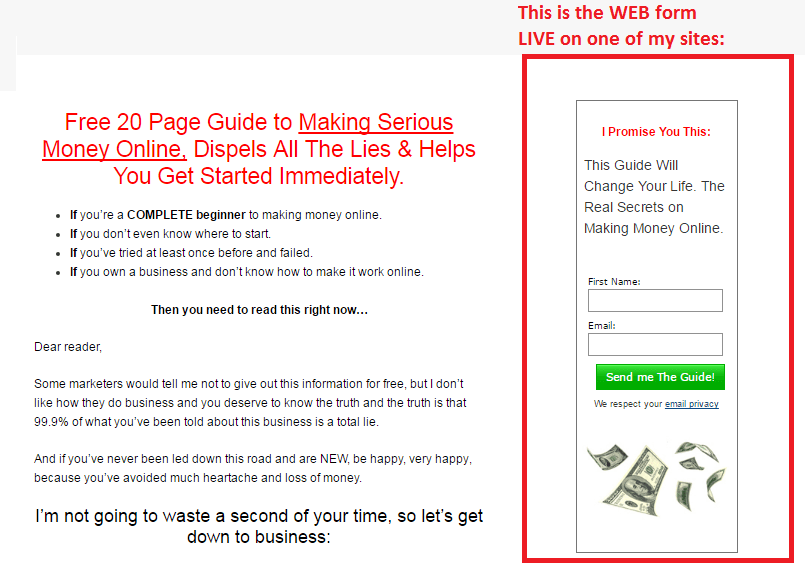
One that is on the right hand side of my site, typically where banners go, and one at the bottom of my site which is meant to reach people who read through my content and have nowhere to go. Providing them a sign up form there also increases conversions:
This is the part you will have to test. Start with a plain web form and see out of how many visitors your site gets, sign up there which web form they sign up to.
Step 7: The FINAL step. Making your web form show up on your site!
When you create your form, you have options on how to put it on your site. I always choose the option where I personally will do it.
When you click on that, an HTML code will be given to you.
You have to take that code and put it on your site, then your web form will appear. I will show you 2 ways to do it:
Through banners:
In WordPress websites, I always put banners on the right side, exactly like the web form 1 illustration in the image above. Basically you create an “image widget” and then put links there.
Usually I put images with clickable links in image widget, but in the case of web forms, you don’t need to do any of that. Just take your HTML code Aweber gave you and paste the HTML link:
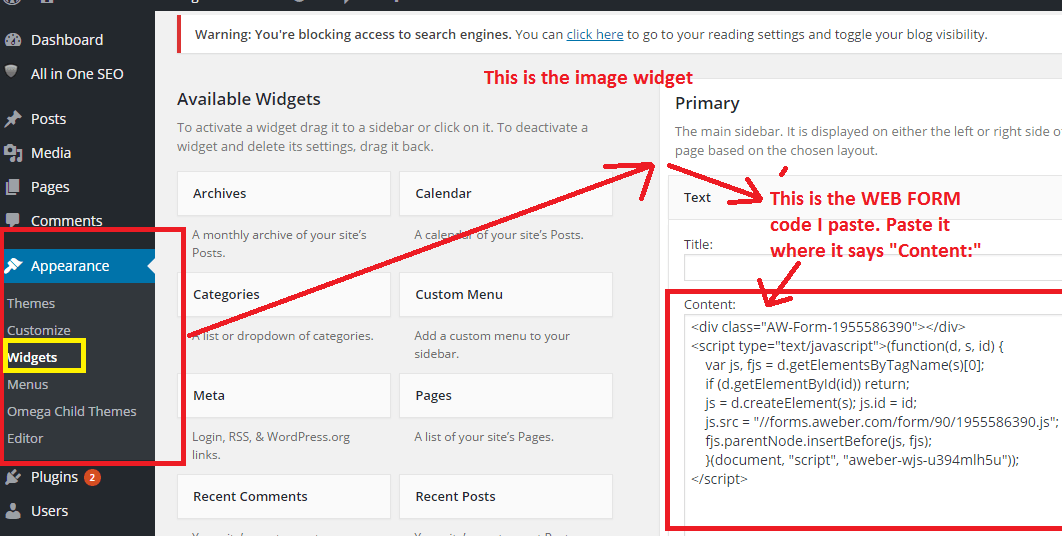
If this part is very confusing, all you need to do is read my tutorial on putting up affiliate links and the part where I put them in banners, but instead of putting ANY links there, JUST paste the HTML code Aweber gave you. It’ll look like the image above. Then when you save it and visit your site, this is an example of how it’ll look:
Update: If you wish to collect email lists in greater numbers, here’s a good tutorial for you to follow.
Through content:
You can also have your web form/s show up right inside your posts or pages by simply taking the same HTML code you get and pasting it in the content, but in the HTML area which for WordPress users will appear as “Text”. If you’re familiar with WordPress sites, the following image will make sense. In this case, I just pasted my web form code at the very bottom of the page:

There are SO many other ways you can set this up, but these are the 2 most common ones I use. At first when you try these, the set up of your email list, the web form, then putting it on your site is going to be tough, but it only takes me a few minutes to do.
3) Now we have the subscribers, we need to keep them.
The last stage is what to do when you get the subscribers. Ideally you want them to not just sign up, but remain signed up and also buy things you email them about. This is the last part where your subscriber base doesn’t just remain but GROWS and you want that to be successful.
To do that, you need to stay in constant communication, but because it can get overwhelming with too many people being signed up eventually, you need to set up automated messages in Aweber. These are called follow up emails. Here is how you set them up:
Step 1: Go back to Aweber and do this:
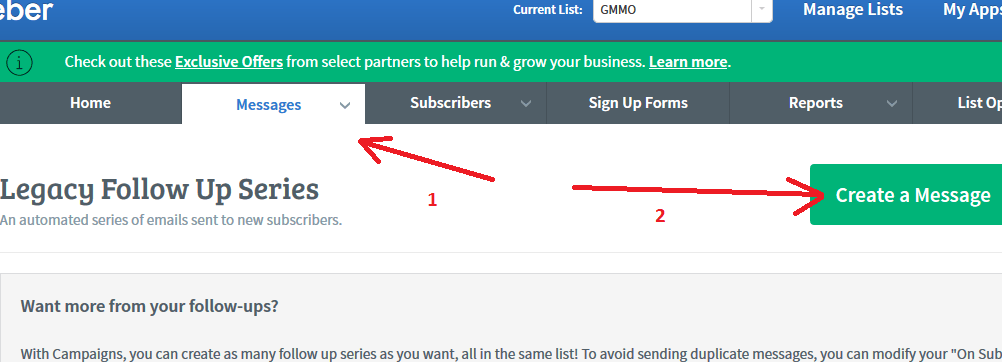
You have 3 options when creating follow ups (In Aweber, they are called “legacy follow ups”.
I always use the plain message option. In it I always thank my subscriber for signing up and provide them whatever I promised in my web form.
- It can be the first of many newsletters to come.
- It can be an eBook which reveals helpful information about my niche.
- It can also be links pointing back to my site and helpful articles I’ve written or more.
- Either way, you have a ton of options and you can make as many follow up newsletters as you want.
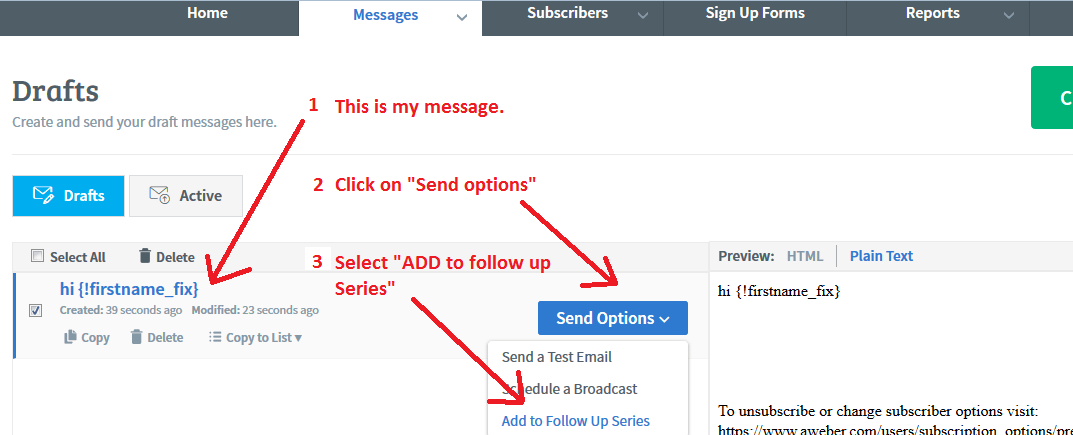
Step 2: Make sure that follow up message is SET to be emailed when subscribers sign up. This is in my opinion a very pesky setting Aweber has and I’ve missed it once before and panicked when my subscribers weren’t getting their messages. Basically you have to manually tell Aweber to have your message be added to the follow up series meaning you tell it that it’s OK to send them the email you wrote up once people sign up. Here is how to do it:
I believe you will have to do this with every email you send, but after your first follow up is created, your next messages will ask you when you want to send the next email. I typically advise sending emails every 2-3 days to stay in touch with subscribers.
I used to write manual messages to subscribers, but now to save time, all I do is in each new follow up email I create, I will provide a link BACK to my website where I wrote up an article that benefits them. That way I keep getting traffic back to my site and more comments.
For example:
If I have a website on say working out, I can get people to sign up for workout tips, then just send them follow up messages every few days linking back to a helpful article I wrote on workout tips.
Then if I want to promote something, I can just send them another email recommending a program with an affiliate link within the email.
Some people choose not to link within their follow ups back to their site and this is fine, but you can also do both.
How many followups should you create? As many as you can. You want to maintain a LONG relationship with subscribers.
My final thoughts:
In this article, I have shown you that you need traffic (1) on your website before you build a list. I have also provided a tutorial on that.
Consider this part the beginning of STARTING a list. And with constant visitors, you can keep building and growing that subscriber base.
I have also shown you how once you have traffic, how to create an put a web form on your site (2). Though that was the LONGEST tutorial, it’s actually the least hardest.
And in the final part (3), we talked about keeping your subscribers. Sometimes your most profitable numbers will come from long term subscribers. To keep them happy, you need to keep giving them access to content they love which has to most of the time be FREE and once in awhile providing a product recommendation.
Before you go, I do also recommend you read one important article I wrote about why the money is not in the list. It will help you understand how to better succeed with email marketing, let alone Aweber.
Hello again Vitaliy,
This is a good post. How well does Aweber work on mobile? Are the forms automatically responsive or did you have to set that yourself?
Do you have difficulty putting your actual email newsletters together using Aweber? For example, when you test them, do they actually look good in different emails such as Gmail, Hotmail or MS Outlook?
Lastly, how do you find the tracking component in Aweber?
Thanks,
Marco
Hi Marco, I’m not sure about the mobile side of Aweber, but if the website where you place the aweber web form is mobile friendly, it should appear fine for users who see the site from a tablet/phone.
I find it’s pretty simple to put together my newsletter, although you should note that it takes time to set up and manage, especially if you have a lot of incoming subscribers.
From my understanding/experience, the emails Aweber sends out look the same for all emails you mentioned. I just make a plain message, although you can make it look pretty through the editor inside Aweber.
And finally, there is an automatic tracking tool within Aweber to show how many people click on your emails.
First of all I want to thank you for this informative article. I recently created my own webpage and was wondering how to include sign up options but never knew how to do it. Your article was the most helpful information I have found on how to accomplish this I will be implementing this into my website now. I have been getting traffic but want to be able to interact with them more and I think this well help with that thank you again
No problem Marquis, consider Aweber if you want to communicate with your traffic outside your website. You can also create a FB fan page, link that on your site and have people message you there if you want a free alternative.
Firstly I would like to know why should I use Aweber over other autoresponders? I have a photography review site and would like to put something like this into place. I do realise that having a email list is a key part of building a online business successfully. I will definitely be following this up but for now in that whole traffic generation side you talked about in your conclusion. How much traffic would you be looking for per day before a autoresponder should be put into place?
I think Aweber has the easiest set up process and their online support chat is easy to reach, plus with the numbers of subscriber they can hold for the prices they charge, I believe a beginner in list building will feel comfortable with program.
Regarding traffic, I normally don’t like to provide an average number but if I were to start collecting a list, I would want probably around 50 visitors a day and aim for a 25% sign up rate (so 7-8 leads a day).
That’s a very good thorough review. I’ve heard a lot about Aweber and it does seem to be the no1 service.
Currently I’ve recently gone with mailchimp because of its abilities with a more fledgling site and smaller subscriber numbers – i’m thinking of upgrading to aweber paid version as and when my site can pay for it itself.
Keep up the good work and passing on your experience.
Hi Vitaliy, this is all useful information. Just wondering, why don’t you have an email list for this site…or have I missed the sign up form? Thanks!!
Hi Natalie, I’m testing different funnels on my site, but the email list is still on the table and you will see it on this site 🙂
Great post and tutorial, I used Aweber many years ago and more recently GetResponse. Both have their good points but Aweber comes out on top as a user friendly platform.
As you said it is critical to be very responsive with your subscribers, to answer all questions and mail them often. Do you have a strategy for delivering offers vs information? Cheers Kev
I always recommend you send out several times more information emails that actually help subscribers with something before going into an offer, then after the offer is emailed, go back into informational emails again.
Hi Vitaliy, just went through your tutorial I found it provided excellent information because I’m new to affiliate marketing and have been curious on how to build an email list. Being from the old school where building lists of any kind started with MS Word or Excel, using Aweber was a real eye opener. The app is so constructive to automate that it makes all tedious tasks of responding and keeping connected so simple…it’s almost heaven-sent in an age of constant email bombardments.
Through your tutorial, you have pretty much covered quite thoroughly how to go about setting up on Aweber, and starting the email list. But in the part where you describe how to set the Legacy Follow Up Series, how or where do you set up the timing in response to email signups, or just to the subscriber’s responses. Is there an area in Aweber that allows you to set the timing? Once I get my website up and running with traffic I will have go through this carefully.
Thanks for your tutorial.
Kevin
Hi Kevin, yeah when you set up a second follow up email, it will give you an option to select how many days after the first you wish to send it. Same thing for the 3rd email and on.
My recommendation is to set up the autoresponder and add the opt-in form when you are ready to build a list. Even if you are not getting a lot of traffic. It is easier to work the bugs and become familiar with the process when you have only a few subscribers. It is also a way to get those new subscribers coming back to your website.
Hi Vitaily,
I am anxious to start a list, but I have been holding off doing so until I have enough traffic to my site. I also felt as if I needed to offer an ebook or something free, but now after reading your article, I have learned I could include a link to a helpful article on my website.
Thanks for the help.
Yeah, you can keep putting all your website’s content to full use by doing this Josh. Most of your visitors will not get to read all of your articles and if they provide value, why not link it to them on a newsletter you’re making? You would them increase their chances of leaving feedback and comments which always help you with SEO and keep subscribers too!